How to Create Your First Activewear Sample
You've validated your concept. You've tested the market feedback. Now you're ready to see your activewear design come to life. But sampling can feel like a black box—which partners do you choose? What do you actually need to provide? How long does it really take?
This guide walks you through the entire 7-step sampling process, cuts through the jargon, and shows you how to avoid the most expensive mistakes founders make. By the end, you'll know exactly what to do next.
The 7-Step Sampling Process
The path from brief to approved sample is more straightforward than you think. Here's the complete roadmap:
1. Clarify Your Brief
Define what you're actually asking for. The more specific here, the faster everything moves.
Size range: Are you sampling XS–XL or a focused size range?
Colorways: 1 color or 5? Neon, pastels, or neutrals?
Quantity: 3–5 pieces is standard for first samples
Special requirements: Custom hardware, logos, or embroidery?
Pro tip: Limit your first sample to 1–2 colorways and 1 size (grading is a later step). This keeps costs down and feedback focused.
2. Choose Your Manufacturing Partner
The type of partner you pick determines your timeline, costs, and flexibility. Here's the key decision:
OEM (Original Equipment Manufacturer) vs. ODM (Original Design Manufacturer) — what's the difference, and which do you need?
OEM (Ready-to-Launch)
You provide your design; they manufacture it on existing patterns and tooling.
Timeline: 5–7 days
Ideal for: First-time samplers who want speed and lower cost.
ODM (Custom Development)
They help design from scratch or heavily modify existing patterns.
Timeline: 21–30 days
Ideal for: Brands with completely custom specs or high-volume commitments.
Our recommendation: Start with OEM sampling. You'll get feedback in less than 2 weeks, iterate quickly, and invest significantly less. Once you've locked in your design, shift to ODM for production-ready samples.
3. Submit Your Technical Specs
You don't need a 50-page tech pack to start. Here's the minimum:
Design sketches or reference images (rough is fine for samples)
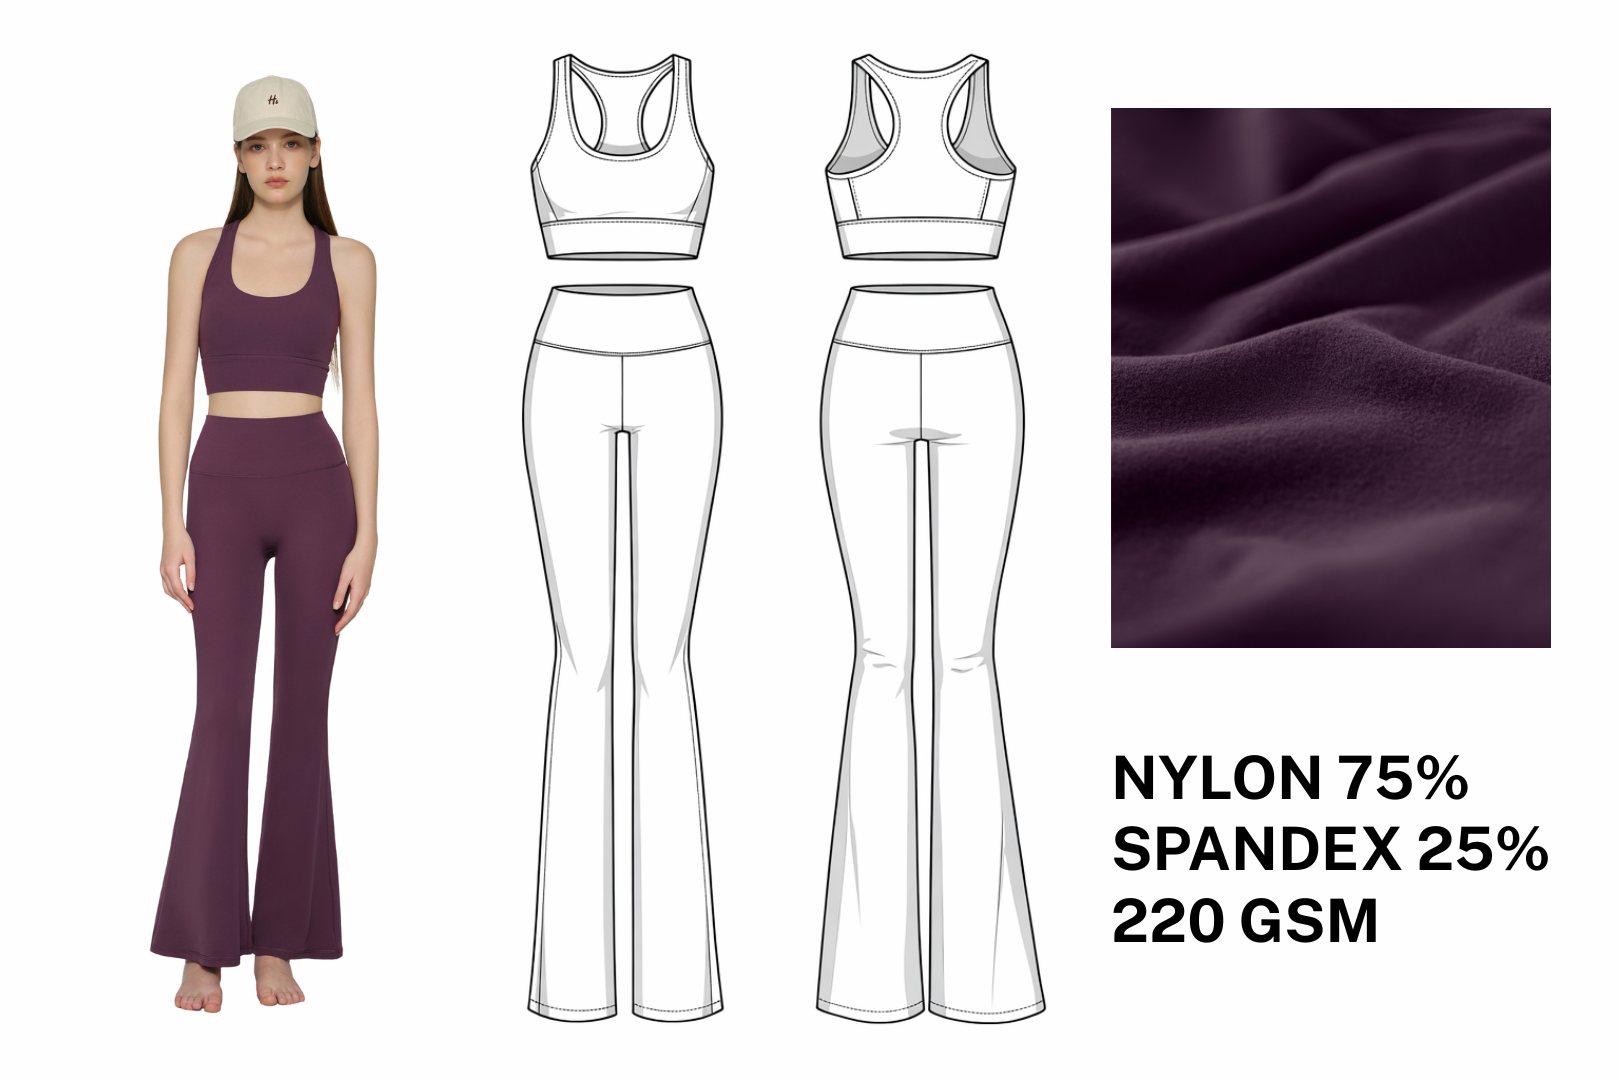
Fabric specs (nylon, polyester, cotton blend; weight in grams per square meter)
Construction details (seam type, closure style, hood type, etc.)
Color references (Pantone codes, fabric swatches, or inspiration images)
Sizing details (measurements for your chosen size)
Your partner will handle grading, pattern drafting, and production setup. You just need to be clear on the fundamentals.
4. Confirm Timeline and Cost
Before you commit, lock in three things:
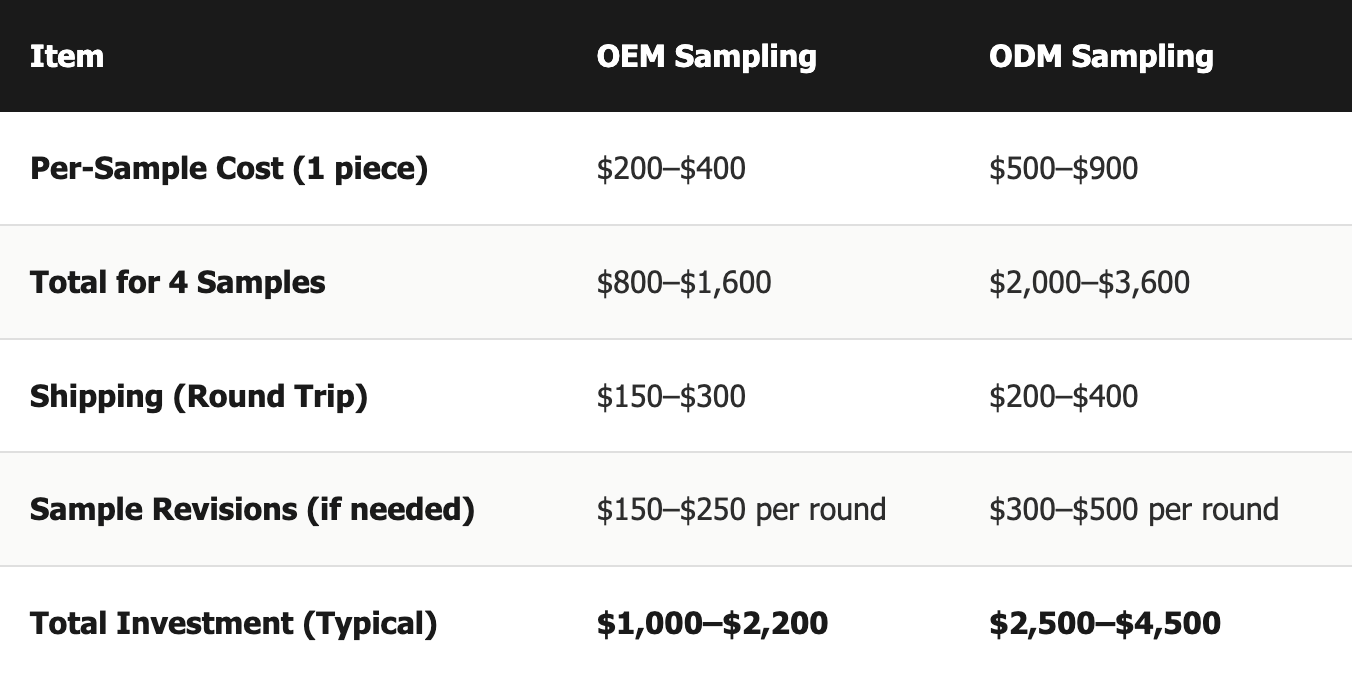
Total cost: Typically $200–$600 per sample depending on complexity, fabric, and customization
Production timeline: Get it in writing (e.g., "5 business days from approval")
Shipping and duties: Who pays? (Usually you cover sample shipping)
"The best partnerships are built on clear expectations. Don't skip this step—a 5-minute call here saves weeks of back-and-forth later."
5. Receive and Inspect Samples
Your package arrives. Here's what to do:
Unbox immediately and photograph everything (for your records and follow-ups)
Check for damage during shipping
Inspect seams for consistency and thread tension
Check the collar/neckline—this is often the first place quality issues show
Feel the fabric weight and hand (does it match your brief?)
Check thread colors and color fastness (no bleeding)
Test zippers, closures, and logos for durability
Measure key dimensions against your spec (chest width, sleeve length, inseam)
6. Evaluate Fit, Quality, and Durability
This is where subjectivity meets data. Ask yourself:
Fit: Does it feel right for your brand? Is it true to your size spec? Does the arm hole sit correctly?
Quality: Are seams clean? Is thread tension even? Any loose threads or puckering?
Durability: Try a gentle wash and dry cycle. Do the colors hold? Does the fabric pill or fade?
Overall feel: Would you wear this? Would your target customer?
Document everything with photos and notes. This becomes your feedback brief for the next iteration.
7. Approve and Lock in Production
Once you're happy, lock it in. Send an official approval that includes:
Approved sample photos (this is your reference for production)
All finalized specs (no more changes without discussion)
Production order quantity and delivery timeline
Payment terms and schedule
This is the point of no return. Once locked, changes cost money and time. Make sure you're truly satisfied before signing off.
OEM vs. ODM: Which Path Gets You to Market Faster?
The choice between OEM and ODM sampling is the biggest determinant of your timeline. Here's why it matters:
OEM Sampling (5–7 days)
What it is: You're sourcing from a pre-existing pattern. The factory already has the base template and tooling in place.
Your advantages:
Ultra-fast turnaround
Lower per-unit sample cost
Perfect for first samples and rapid iteration
Minimal spec writing required
Your trade-offs:
Limited design flexibility
You're working within existing measurements
May need adjustments for fit
ODM Sampling (21–30 days)
What it is: Custom pattern development. The factory is creating or heavily modifying a template just for you.
Your advantages:
Complete design control
Bespoke fit for your brand
Suitable for high-volume production
Design support from the factory
Your trade-offs:
Significantly longer timeline
Higher sample costs ($500+)
More detailed specs required
Potential for design revisions
The Smart Founder's Path: Hybrid Approach
Start with OEM sampling (5–7 days). Get quick feedback. Validate that people actually want to wear it. Once you've confirmed demand and locked your design, move to ODM for your full production run. This keeps your upfront investment lean while ensuring your product is genuinely market-ready.
7 Common Sampling Mistakes (and How to Avoid Them)
1. Overspecifying the First Sample
Asking for 3 colorways, custom embroidery, custom hardware, and premium grading all at once.
✓ Start simple. Nail the base product first, then layer on customization.
2. Vague Briefs
"Make me a yoga top" without specifying fit, fabric weight, or construction details leads to samples that miss the mark entirely.
✓ Spend 30 minutes creating a clear brief. Include reference images and specific measurements.
3. Ignoring the Power of Grading
Sampling one size and assuming it grades perfectly to all sizes. It doesn't. Fit breaks down.
✓ Sample your marked size only. Grade and test later, once base fit is locked.
4. Rushing Approval
Approving samples without testing them. Wearing, washing, and stress-testing is essential.
✓ Give yourself at least 5 days of real-world wear before locking in production.
5. Underestimating Communication
Going silent after placing an order. Then asking for changes three days before delivery.
✓ Set up a weekly check-in cadence. Ask for in-process photos. Stay aligned.
6. Choosing Partners Based on Price Alone
The cheapest factory isn't always the fastest or most reliable. You get what you pay for.
✓ Factor in timeline, communication quality, and sample accuracy. Invest in a partner who gets you.
7. Skipping the Fine Print
Not discussing payment terms, revision costs, or what happens if you need changes mid-sample.
✓ Get everything in writing. Know the cost of a revision. Understand the approval process upfront.
Red Flags in Sample Feedback: What to Negotiate vs. What to Accept
When samples arrive, you'll get feedback from testers, advisors, or your own gut. Not all feedback is equal. Here's what matters:
🚩 Serious Concerns (Rework Required)
Fit is off by 1+ inches — seams are coming apart, fabric is the wrong weight, color is drastically different, hardware is failing after one wear
✓ Acceptable Concerns (Minor Tweaks)
Slightly loose armhole, thread color is close but not exact, tag placement is off by 0.5", seams are clean but could be tighter
🚩 Scope Creep Warning Signs
"Can we change the hood design?" "We need custom zippers now." "What if we added a reflective strip?" — These are manufacturing changes, not tweaks. They cost time and money.
✓ Green-Light Feedback
"Fits true to size." "Fabric feels great." "Would buy this." "Logo placement looks professional." — You're ready to lock in production.
Cost Expectations and ROI
Samples are an investment in validation, not production. Here's what to budget:
ROI Perspective
What you're buying: Certainty that your design works before manufacturing 500+ units. The cost of one production run mistake (wrong fabric, bad fit, color mismatch) can be $10,000+. A few thousand in samples prevents catastrophic losses.
The real ROI: You'll launch with confidence. You won't have 200 unwearable units in your warehouse. Your first customers will actually keep your product—and become repeat buyers.
Ready to Start Your Sampling Journey?
You've got the roadmap. Now take the next step and submit your first sample request. Get feedback in hand within 5–7 days.
Your Sampling Checklist
Before you hit submit, make sure you have:
Clear design brief with reference images
Fabric specifications (type, weight, composition)
Construction details (seams, closures, hardware)
Color references (Pantone codes or swatches)
Size measurements for your marked size
Quantity (typically 3–5 samples)
Timeline expectations (confirm 5–7 days for OEM)
Budget ($1,000–$2,500 for comprehensive first samples)
The Bottom Line
Sampling doesn't have to be complicated. You don't need perfect specs, a massive budget, or months of lead time. What you need is clarity on what you're making, a reliable partner, and the discipline to iterate quickly based on real feedback.
The founders who move fastest are the ones who sample early, test thoroughly, and lock in designs once they've proven them. That's your path to launch.
So take the first step. Submit your sample request today. In less than two weeks, you'll have a physical product in your hands—and with it, the clarity to move confidently into production.
Get Your Samples in 5–7 Days
Browse our ready-to-launch catalog to avoid starting from scratch. Pick your base, customize your logo branding, and ship within days.
Have sampling questions? Reach out to our team. We're here to make this as friction-free as possible.